DESIGN PAGE
LASER CUTTER UNIT
My design process:
MY DESIGN BRIEF
CLICK BELOW TO VIEW MY FULL DESIGN BRIEF
In my design brief, I gave the viewer a brief summary of my client Patrick Johnson and my result of the product's design and its use of it. I began by writing down his ideas for what he desired to say and what he would use them for. I then looked at the internet layout to get a better idea of how my finished product will look.
My Design Specification
in my design specification, I included more of detailed information like the size, color, materials, and process. My design is very simple, therefore I didn't need to calculate or do anything complicated.

The Process of Making My Final Product:
In Illustrator, I traced over this image. Basically, this is the reference image I used to create the main of my design. After tracing everything, I wanted to use a laser cutter to make a heart-shaped piece of wood (which worked).
I forgot to take a photo of my product before assembling and painting it. The wood was very sharp, so I sanded it to make the slides smoother until noticing that the heart didn't really look like a heart I tried my best to shape it into a proper heart, next time I should keep in mind actually to trace properly.
Final product
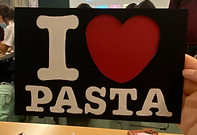
This is my final product. Instead of having the entire thing built out of wood, I used the laser cutter to cut out the heart part and glued red paper below the wood to give it a painted effect. I also painted the background black to make the white stand out more.
Scrap pieces
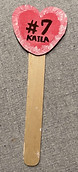
Since Seisen is promoting/focusing on being more sustainable this year, I decided to build my friend a cheering sign for her volleyball game instead of throwing away the spare pieces of wood. I painted her jersey number and her name on the sign. I decided not to paint the stick so that the paint wouldn't melt while you were holding it.

reference photo
NO PHOTO
final product
scrap pieces